

Turning a Day Boat into a Legal, Safe Night-Fishing Platform
Making an inflatable boat night-fishing ready is not a matter of clipping on a battery lantern. It is a systems upgrade that touches electrical supply, navigation lighting, fish-finding electronics, rod and tackle management, safety redundancy, and crew visibility. The correct accessory set depends on hull size, tube and floor construction, engine type, and whether the boat operates inland, coastal, or offshore. A 3.0 m roll-up tender used on a sheltered reservoir carries a very different accessory load than a 4.5 m rigid-hull inflatable (RIB) fished at night in coastal swell. This guide outlines the accessory categories commercial buyers, rental fleet operators, and serious end users should verify before committing to a night-fishing configuration.
Start With the Electrical Architecture, Not the Accessories
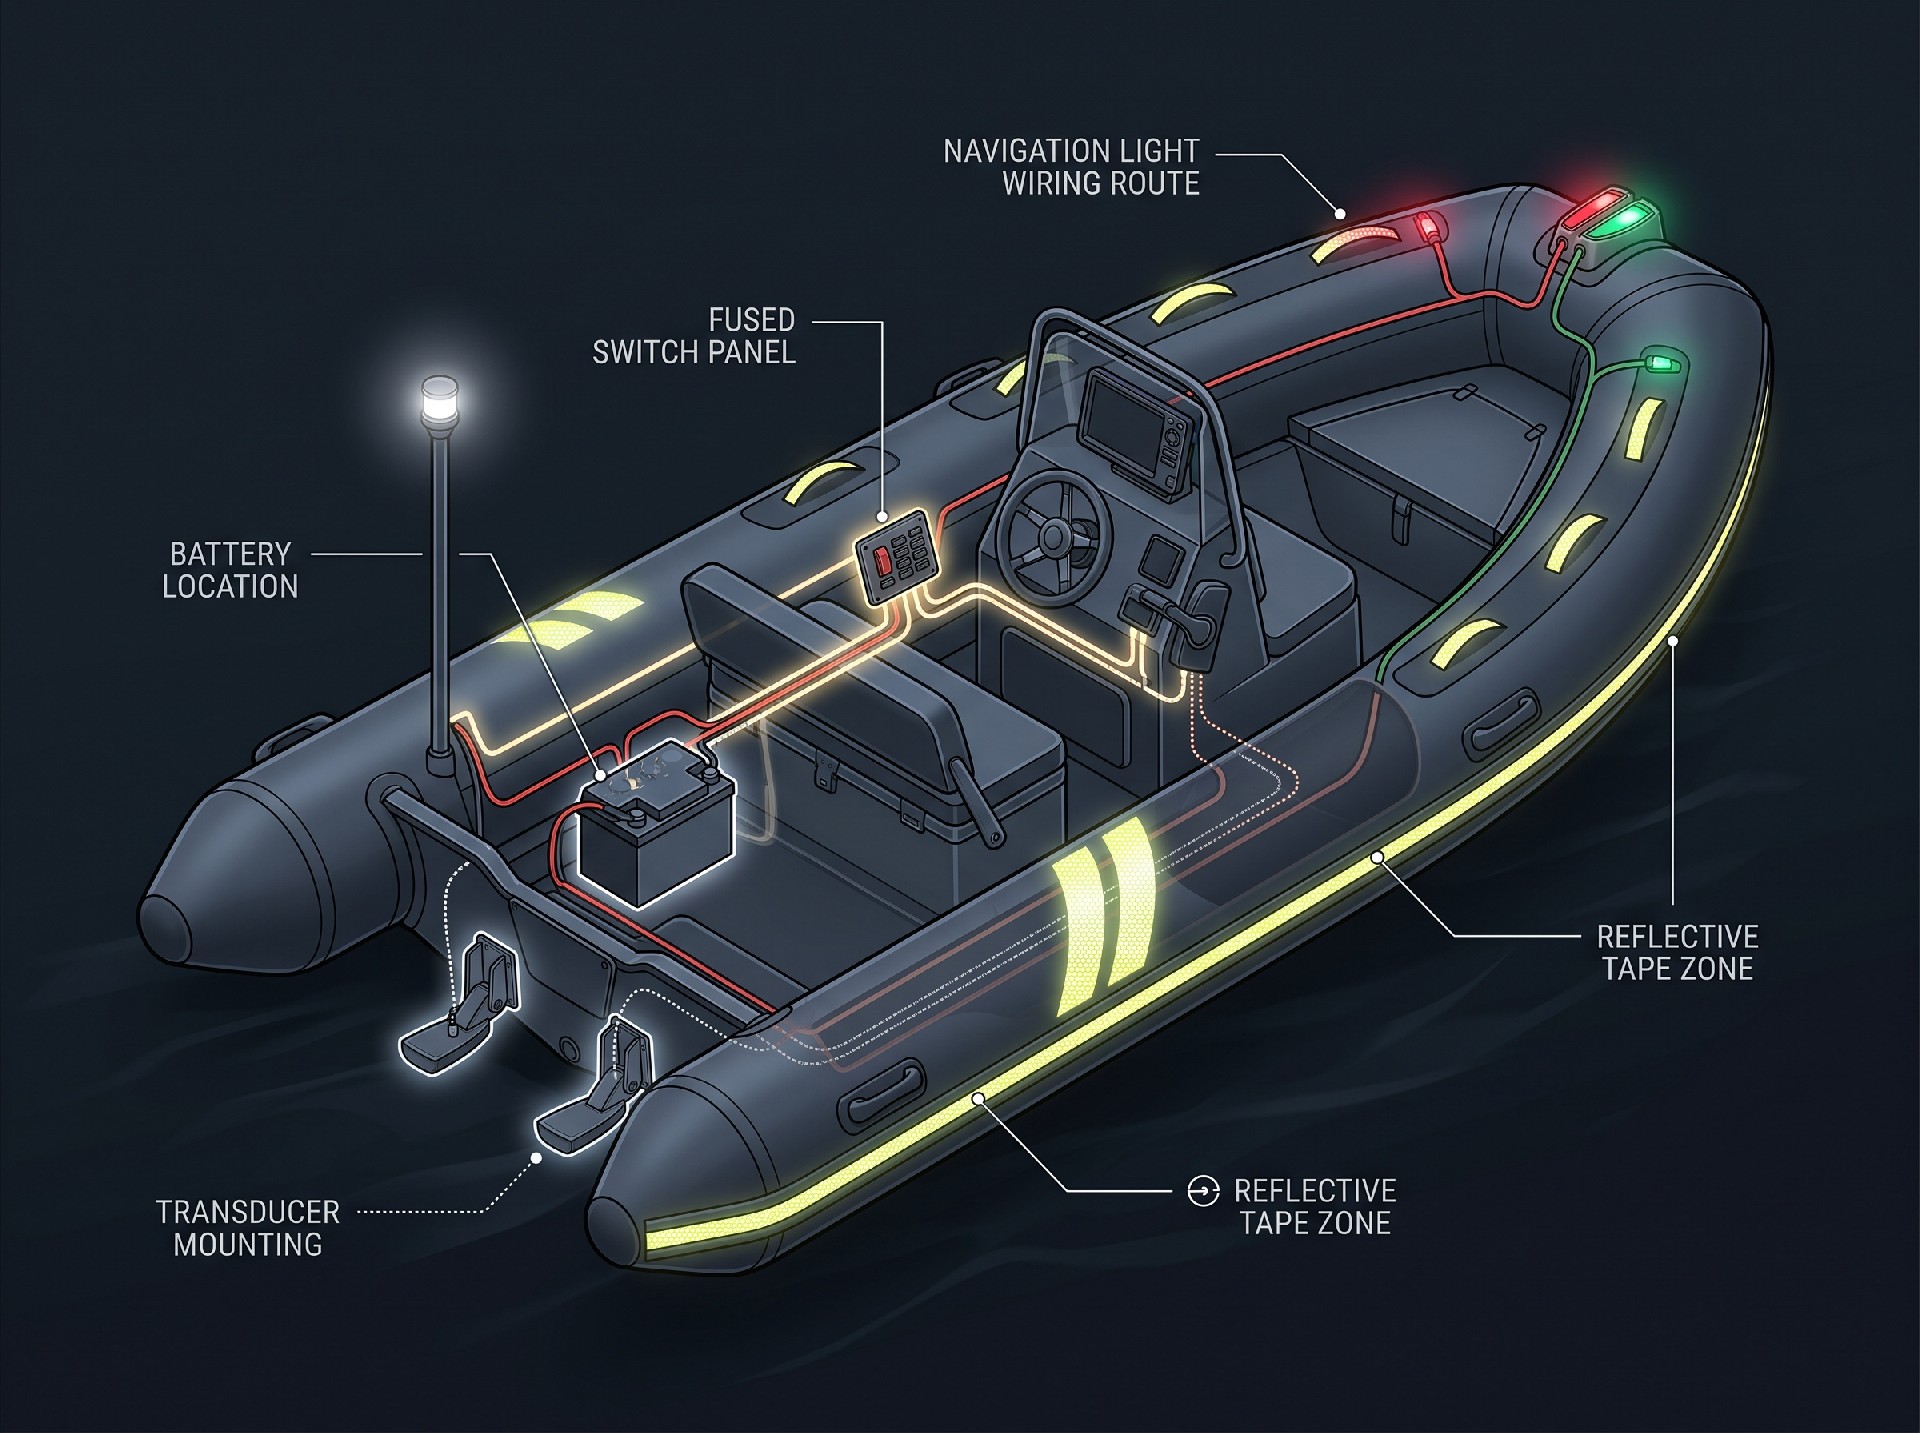
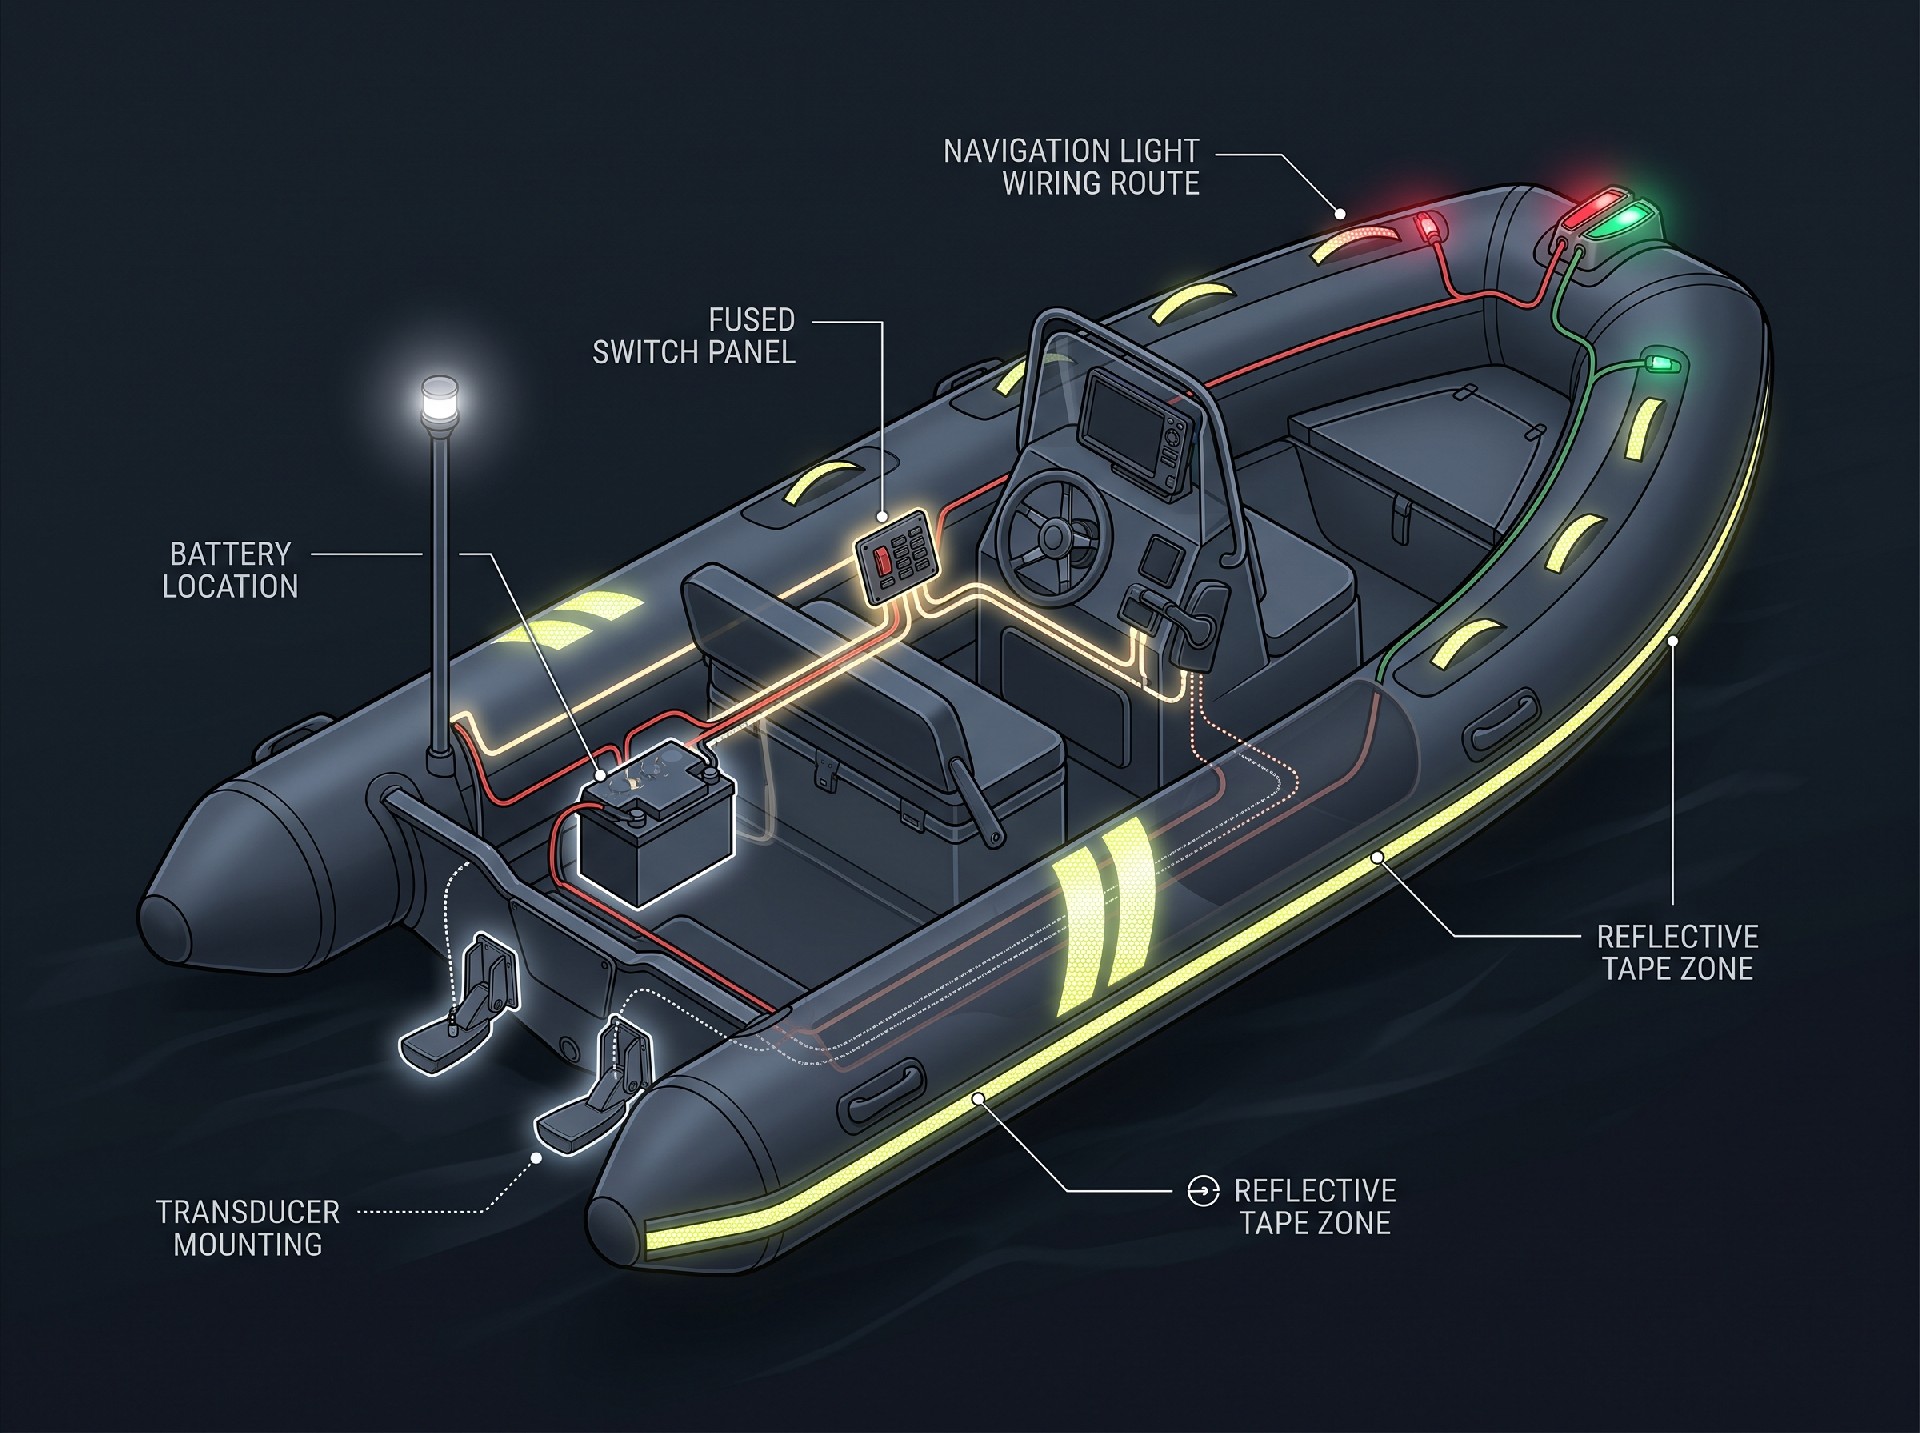
Every night-fishing accessory depends on power. On an inflatable boat, the battery bank is the constraint. Outboard charging output is often limited on small portable engines, and an inflatable hull has little space for large lead-acid banks.
Battery and distribution essentials
Dual-purpose or deep-cycle marine battery sized to the combined draw of navigation lights, fish finder, bilge pump, and any livewell or aerator. Typical commercial small-boat banks run 70–110 Ah, but this is supplier- and engine-dependent; verify against the actual load calculation.
Fused switch panel or distribution block with individually labeled circuits. A single master switch reduces parasitic drain and simplifies fault isolation at night.
Waterproof connectors rated for the spray and immersion exposure typical of an open inflatable. Avoid household-grade terminals.
Spare fuses and a headlamp stored in a dry bag. Electrical faults at night are the most common reason a trip ends early.
A useful rule: calculate total continuous draw in amps, multiply by expected hours of use, and add a 30–50% reserve. If the required bank weight threatens stability or payload, reduce accessory count rather than compromise reserve.
Charging and redundancy
If the outboard has limited charging capacity, a small portable solar panel or a second charged battery carried as a reserve may be more practical than a larger single bank. For rental fleets, a shore-based charging rotation is usually more reliable than relying on engine charging alone.
Navigation and Position Lighting: The Non-Negotiable Accessory Set
Night operation requires the vessel to be visible and to display the correct lights for its length and mode of operation. Rules vary by jurisdiction and by whether the boat is anchored, underway, or drifting. Buyers should confirm the applicable local requirement with a qualified marine compliance professional before purchase.
Typical lighting package for an inflatable under 7 m
All-round white light on a pole or mast, positioned to be visible through 360 degrees.
Sidelights (red and green) or a combined bi-color light, depending on hull length and local rule.
Stern light if the configuration requires a separate white stern light.
Anchor light when anchored or drifting at night.
On an inflatable, light mounting is a design decision. Suction cups fail when tubes are wet or coated. Clamp-on brackets and adhesive pads work only on specific tube materials and may not hold on textured or coated surfaces. The most reliable approach is a purpose-made light pole mounted to a hard point, such as a transom bracket or a reinforced seat, with the cable routed through a protected gland.
Visibility beyond the legal minimum
Legal lighting is not the same as being seen. Reflective tape on the tubes, a strobe or high-visibility masthead light for emergency use, and a handheld waterproof searchlight improve real-world safety. For rental fleets, reflective tube patches also help other vessels and rescue services locate the boat.
Fish-Finding and Sonar Accessories
Sonar is the core night-fishing electronic accessory. Without daylight to read water color, depth, or structure, the fish finder becomes the primary situational awareness tool.
Transducer mounting on an inflatable
This is where inflatable boats differ from hard-hull boats. Options include:
Transom-mount transducer on a small mounting plate bonded or bolted to the transom. Suitable for RIBs and boats with a rigid transom.
Portable suction-cup transducer for roll-up or soft-transom boats. Works only on smooth surfaces and can release at speed; not ideal for rough water.
Trolling-motor mounted transducer where a motor is used, keeping the cable run short.
Buyers should verify that the chosen transducer frequency and power suit the intended depth and target species. A high-frequency unit gives detail in shallow water; lower frequency penetrates deeper but with less resolution.
Display and mounting
The display must be readable at night without destroying night vision. Most modern units offer dimming and night color palettes. A RAM-style mount or a purpose-built bracket attached to a seat or thwart keeps the unit stable and within reach. On an inflatable, avoid drilling into tubes; use seat-mounted or strap-mounted solutions where possible.
| Accessory Category | Typical Night-Fishing Requirement | Why It Matters at Night | Buyer Check |
|---|---|---|---|
| Navigation lighting | All-round white light plus sidelights or bi-color light, depending on hull length and local rule | Legally required visibility and collision avoidance | Confirm applicable rule for vessel length and operating mode; verify mounting surface on tubes or transom |
| Battery and distribution | 70–110 Ah deep-cycle or dual-purpose bank with fused switch panel (typical commercial small-boat range; verify against load calculation) | Powers lights, sonar, pump, and accessories for the full trip | Calculate total amp draw and reserve; confirm charging capacity of outboard |
| Sonar and transducer | Fish finder with dimmable display and transom-mount, suction-cup, or trolling-motor transducer | Primary situational awareness when visual cues are limited | Match frequency and power to depth and target species; confirm mounting method for hull type |
| Rod and tackle management | Clamp-on or rail-mount rod holders, horizontal rod racks, leashes, and waterproof tackle storage | Prevents gear loss and trip hazards in low visibility | Verify holder geometry matches reel type; keep heavy gear low and centered |
| Safety and signaling | PFDs with reflective elements, VHF or PLB/EPIRB where required, first-aid kit, repair kit, spare pump, throwable flotation with light | Reduces consequence of puncture, power loss, or man-overboard | Confirm local equipment rules; organize repair kit for one-handed use |
| Crew visibility | Reflective tape on tubes and gear, red-mode headlamps, LED markers or chemical lights | Improves crew location and rescue visibility | Avoid excessive light that destroys night vision; use red or low-output modes |
| Compliance documentation | Local navigation-light and safety-equipment requirements, registration where applicable | Determines legal operation and insurance validity | Verify with a qualified marine compliance professional for the specific jurisdiction and water body |
Rod, Tackle, and Deck Management for Night Use
At night, loose gear becomes a trip hazard and a loss risk. Accessory planning should assume reduced visibility and one-handed operation.
Rod holders and storage
Clamp-on or rail-mount rod holders for boats with a suitable rail or seat frame.
Flush-mount holders only where a hard mounting surface exists, typically on a RIB console or transom.
Horizontal rod racks under a seat or along the tube to keep spare rods out of the walking path.
Check that the holder geometry matches the reel type. A holder that fits a spinning reel may not secure a conventional reel at the angle required for trolling or drifting.
Tackle and tool access
Waterproof tackle bags or boxes with lanyards for pliers, cutters, and hook removers.
Glow-in-the-dark or illuminated tools for hook removal and knot tying.
Headlamp with red-light mode to preserve night vision while rigging.
Rod leashes to prevent loss overboard in the dark.
On an inflatable, weight distribution matters. Keep heavy tackle low and centered. Avoid concentrating mass on one tube or on the bow, which can affect trim and, in extreme cases, stability.
Safety, Emergency, and Crew-Visibility Accessories
Night fishing raises the consequence of every failure. A puncture, a dead battery, or a man-overboard event is far more serious after dark.
Required and recommended safety items
Personal flotation devices for every person aboard, worn rather than stowed. For night use, models with reflective elements and a whistle are preferable.
Waterproof VHF radio or a registered EPIRB/PLB where the operating area and local rules require it.
First-aid kit in a waterproof case, including a thermal blanket.
Manual bilge pump or bailer plus a sponge. An inflatable can take on water through spray, rain, or a slow leak.
Repair kit with material patches, adhesive, and a valve tool matched to the boat's valve type. Repair at night is difficult; the kit should be organized for one-handed use.
Spare inflation pump or a top-up pump for low-pressure tube maintenance.
Throwable flotation device with a light or reflective tape.
Visibility and signaling
Waterproof flashlight and a strobe light for emergency signaling.
Reflective tape on tubes, oars, and PFDs.
Chemical light sticks or LED markers for crew and gear.
For commercial operators, a written night-operation checklist and a pre-departure briefing should accompany the accessory package. Accessories do not replace procedure.
Buyer Decision Sequence: Specifying a Night-Fishing Inflatable
Use the following sequence to decide which accessories are genuinely required versus optional for a given hull and use case.
Step 1 — Define the operating envelope: inland, coastal, or offshore; anchored, drifting, or trolling; solo or crewed. This determines lighting, communication, and safety requirements.
Step 2 — Calculate electrical load: list every 12 V accessory, its amp draw, and expected hours. Size the battery bank and charging method accordingly.
Step 3 — Confirm mounting surfaces: identify which accessories can be clamped, strapped, or bonded, and which require a hard point. Avoid drilling into inflatable tubes.
Step 4 — Verify compliance: confirm local navigation-light, safety-equipment, and registration requirements with a qualified professional. Standards and rules differ by country and water body.
Step 5 — Prioritize redundancy: spare fuses, a backup light, a repair kit, and a second communication method are more valuable than additional convenience accessories.
Step 6 — Match accessory weight to payload: every added item reduces available payload and can affect trim. Confirm the boat's rated capacity and keep a margin.
For rental fleet operators, the accessory package should be standardized and inspected between uses. For individual buyers, the package should be built around the actual fishing method and water body rather than a generic kit. The right configuration is the one that keeps the boat visible, powered, and recoverable when something fails after dark.