

Why Saltwater Corrosion Accelerates on Boats — and What to Do First
Saltwater corrosion on a boat is not a cosmetic problem. Once chloride ions breach a protective oxide layer, pitting and galvanic attack can compromise steering, engine mounts, through-hull fittings, and deck hardware within a single season. The correct first action is not to polish the damage, but to identify the corrosion mechanism — galvanic, crevice, pitting, or stray-current — because each demands a different repair and prevention strategy. This guide is written for boat owners, marine maintenance teams, and commercial fleet operators who need a field-usable diagnostic and corrective sequence, not a chemistry lecture.
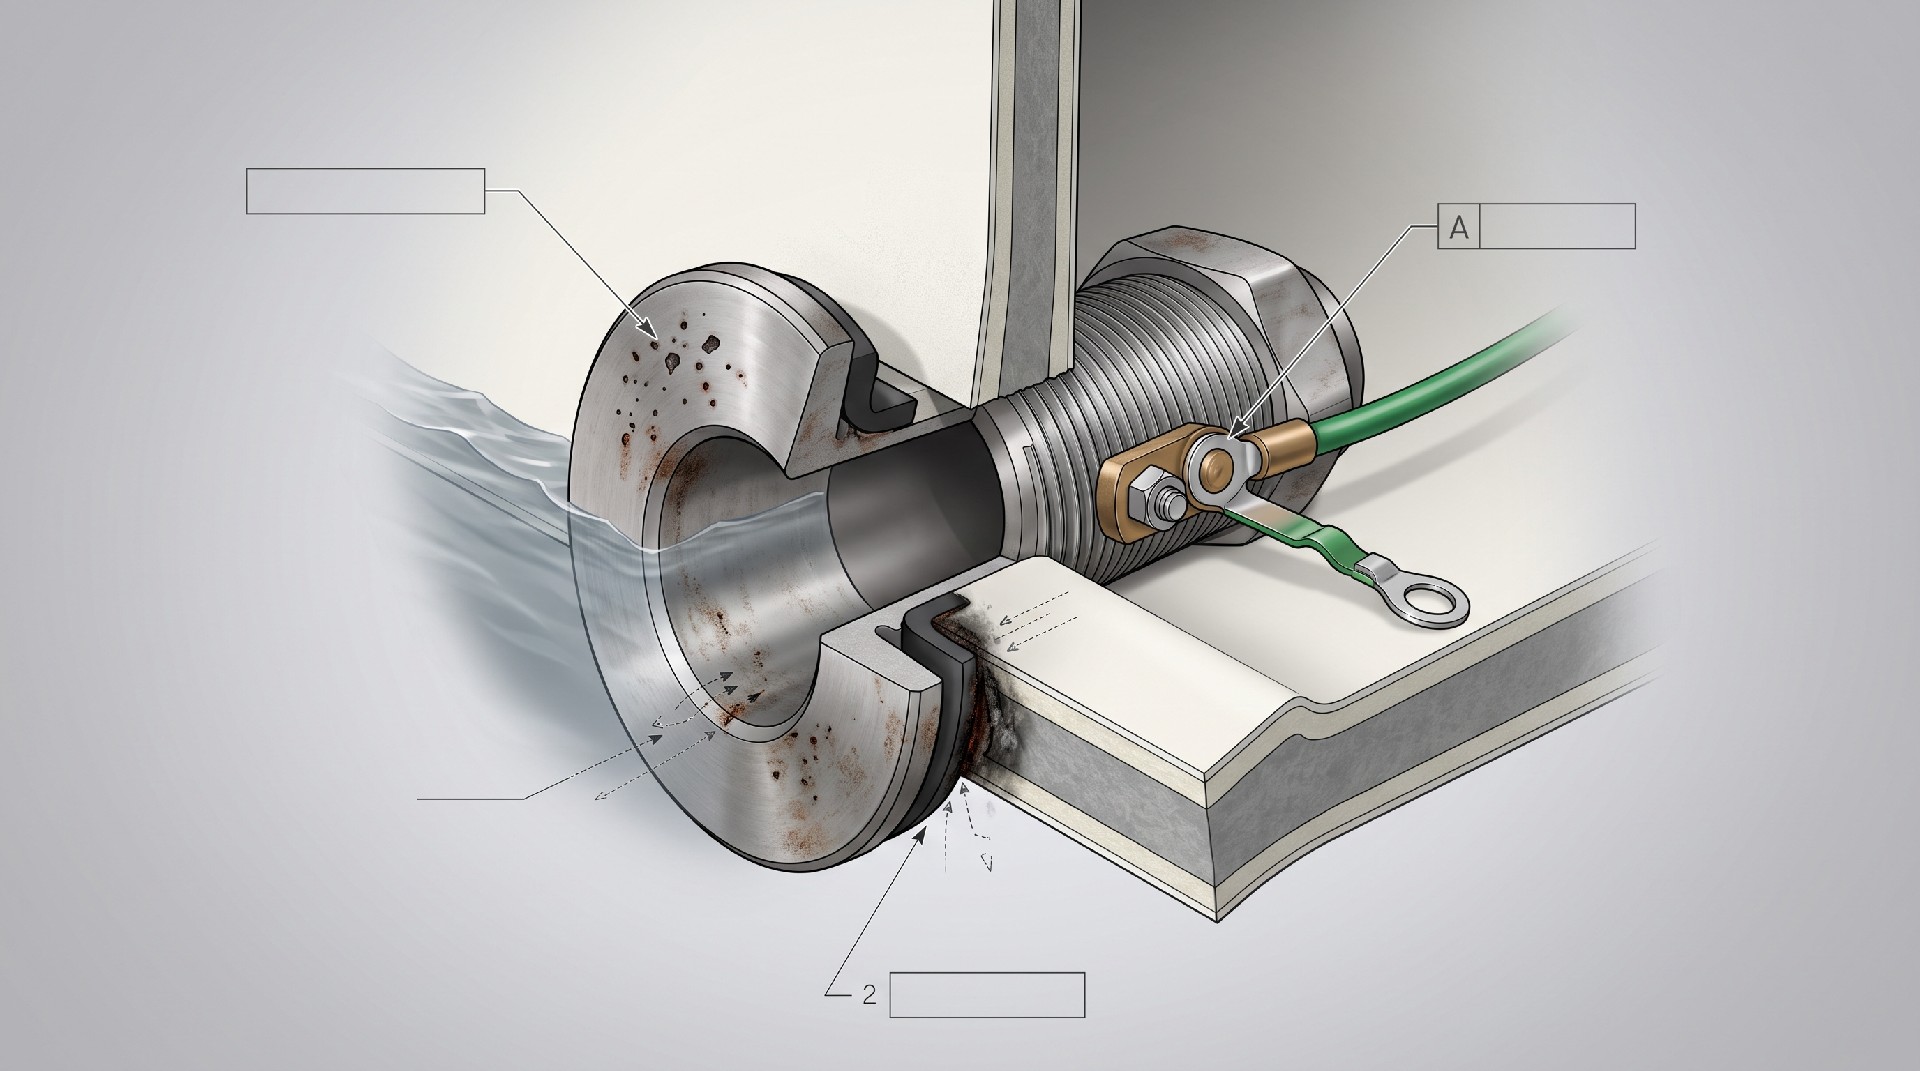
Identify the Corrosion Type Before Touching the Metal
Saltwater corrosion on boats typically falls into one of four categories. Misdiagnosis leads to repeated failures and wasted labor.
Galvanic Corrosion
Occurs when two dissimilar metals are electrically connected in an electrolyte — saltwater. The less noble metal (anode) sacrifices itself. Common on aluminum outboard brackets bolted to stainless steel, or bronze through-hulls bonded to steel hulls. Look for uniform wastage near the joint, white or green powdery deposits on aluminum, and a clear direction of metal loss.
Pitting Corrosion
Localized breakdown of the passive film on stainless steel or aluminum. Chlorides attack weak points, creating deep, narrow pits that may be invisible under paint or scale. Stainless steel 304 is particularly vulnerable; 316 offers better resistance but is not immune. Pitting is dangerous because it can perforate a fitting while the surrounding surface looks intact.
Crevice Corrosion
Develops in stagnant, oxygen-depleted gaps — under washers, gaskets, marine growth, or tight faying surfaces. The shielded area becomes anodic relative to the open surface. Signs include dark staining, rust bleeding from a joint, and metal loss concentrated exactly at the crevice line.
Stray-Current Corrosion
Caused by external electrical currents, often from shore power or a neighboring boat. Metal loss can be rapid and severe — a propeller or shaft can fail in weeks. Look for unexplained anode consumption, bubbles around underwater metals, and a metallic taste or smell near the waterline.
Field Diagnostic Sequence for Corroded Components
Work from least invasive to most invasive. Document each step with photos and notes — this record supports warranty claims and insurance assessments.
Visual inspection: Check for rust streaks, white aluminum oxide, green copper salts, pitting, and paint blistering. Note whether corrosion is uniform, localized, or at a joint.
Tap test: Lightly tap suspected areas with a small hammer. A dull or hollow sound may indicate subsurface metal loss.
Cleaning and re-inspection: Remove scale, marine growth, and loose paint with a non-metallic scraper and fresh water. Do not use acid-based cleaners on aluminum or galvanized steel.
Dye penetrant or ultrasonic thickness testing: For critical components — through-hulls, chainplates, rudder shafts — use non-destructive testing to measure remaining wall thickness. Compare against the original specification or a known-good reference.
Electrical checks: Measure hull potential with a reference electrode, check bonding continuity, and test for stray current using a clamp meter around shore power cables.
If a component has lost more than 25–30% of its original section thickness, or if pitting depth exceeds 50% of wall thickness, replacement is generally safer than repair. These thresholds are typical commercial guidance — verify against the component manufacturer's data and the vessel's classification requirements.
| Component / Metal | Corrosion Type | Field Diagnostic | Corrective Action |
|---|---|---|---|
| Aluminum outboard bracket | Galvanic or pitting | White powdery oxide, pitting under paint, metal loss near stainless fasteners | Clean to bare metal, chromate conversion or epoxy primer, polyurethane topcoat, replace if section loss >25% |
| Stainless steel chainplate | Crevice or pitting | Rust bleeding from deck joint, dye penetrant shows cracks or pits | Remove, clean, passivate, inspect for cracks; replace if pitting >50% wall thickness or any crack found |
| Bronze through-hull | Dezincification | Pinkish or reddish tint, soft metal, porous surface | Replace immediately if color change is more than superficial; verify with hardness test |
| Galvanized anchor chain | Uniform and pitting | Rust on links, stiff joints, section loss | Replace if section loss >10% or joints stiff; recoat only for mild surface rust |
| Stainless steel bow rail | Pitting | Small dark pits, rust streaks, passive layer breakdown | Grind out pits, passivate with citric acid, re-coat if desired; replace if pitting is widespread |
| Zinc anode | Sacrificial (normal) | 50% or more consumed, white corrosion product | Replace with same alloy; if consumption is rapid, investigate stray current |
| Aluminum T-top frame | Galvanic at fasteners | White oxide around stainless bolts, paint blistering | Isolate fasteners with nylon washers, apply corrosion inhibitor, recoat frame |
Corrective Actions by Component and Corrosion Type
Repair method depends on the metal, the component's structural role, and whether the corrosion is active or dormant.
Aluminum Components (Outboard Brackets, T-Tops, Rails)
Remove all white oxide by mechanical means — stainless steel wire brush dedicated to aluminum, or a Scotch-Brite pad. Do not use a brush that has touched carbon steel. For minor pitting, apply a chromate conversion coating or a proprietary aluminum pretreatment, then prime with a zinc chromate or epoxy primer and topcoat with a marine-grade polyurethane. For structural cracks or deep pitting, weld repair by a qualified marine welder is required, followed by re-anodizing or coating. Never use copper-based anti-seize on aluminum — it promotes galvanic attack.
Stainless Steel (Bow Rails, Cleats, Chainplates)
Stainless relies on a passive chromium oxide layer. After cleaning, passivation with nitric or citric acid restores that layer. For pitting, grind out the pit to sound metal, then re-passivate. If pitting is widespread or the component is highly loaded — chainplates, rudder stocks — replace with 316L or duplex stainless. Avoid carbon steel brushes and abrasive pads that embed iron particles, which become corrosion initiation sites.
Bronze and Brass (Through-Hulls, Seacocks, Propellers)
Bronze corrosion often appears as a pinkish or reddish tint — dezincification or dealuminification. If the color change is superficial, clean and monitor. If the metal is soft, porous, or structurally weakened, replace. Brass is not suitable for submerged marine service; replace with bronze or stainless steel where appropriate.
Galvanized Steel (Trailers, Anchor Chain, Some Fittings)
Zinc coating sacrifices itself to protect the steel. Once the zinc is consumed and rust appears, the protection is gone. Clean to bare metal, remove rust, and recoat with a zinc-rich primer plus a marine topcoat. For chain, replace if links show significant section loss or stiff joints.
Prevention: Breaking the Corrosion Triangle
Saltwater corrosion requires three conditions: an electrolyte (saltwater), a metallic path, and an oxygen or potential difference. Removing any one condition stops the process. Practical measures for boat owners and fleet operators:
Anodes: Fit zinc or aluminum sacrificial anodes to all submerged metals. Check monthly and replace when 50% consumed. Aluminum anodes are preferred in brackish or freshwater; zinc for saltwater. Do not mix anode alloys on the same bonding circuit.
Bonding and grounding: Bond all underwater metals to a common ground point and to the anodes. Verify continuity annually — resistance should be less than 1 ohm between bonded components.
Coating systems: Use a compatible primer and topcoat system. For aluminum, epoxy barrier coat plus polyurethane topcoat. For steel, zinc-rich primer plus epoxy plus polyurethane. Maintain coating integrity — a single breach becomes a corrosion cell.
Freshwater rinse: After every saltwater use, rinse the boat, trailer, and equipment with fresh water. Pay attention to crevices, fasteners, and under fittings. This is the single most cost-effective corrosion control measure.
Corrosion inhibitors: Apply a thin film of corrosion-inhibiting compound — not grease — to exposed metal surfaces, electrical connections, and battery terminals. Reapply every 3–6 months or after heavy exposure.
Stray-current protection: Use a galvanic isolator or isolation transformer on shore power. Never leave a boat plugged in for long periods without verifying hull potential.
Repair vs. Replace: A Decision Framework
Not every corroded component needs replacement, but under-repairing a critical part creates safety and liability risk. Use the following criteria.
Repair When:
Corrosion is superficial — surface rust, light oxidation, or cosmetic staining.
Section loss is less than 10–15% and the component is non-structural.
The metal can be cleaned, passivated, and recoated with a proven system.
The component is accessible for future inspection.
Replace When:
Section loss exceeds 25–30% or pitting depth exceeds 50% of wall thickness.
The component is structurally critical — chainplates, rudder shafts, through-hulls, engine mounts, steering components.
Corrosion is active and recurring despite proper repairs.
Dezincification or dealuminification is present in bronze or brass.
Stray-current corrosion is confirmed and the source cannot be eliminated.
The cost of repair exceeds 50% of replacement cost, or the component's remaining service life is uncertain.
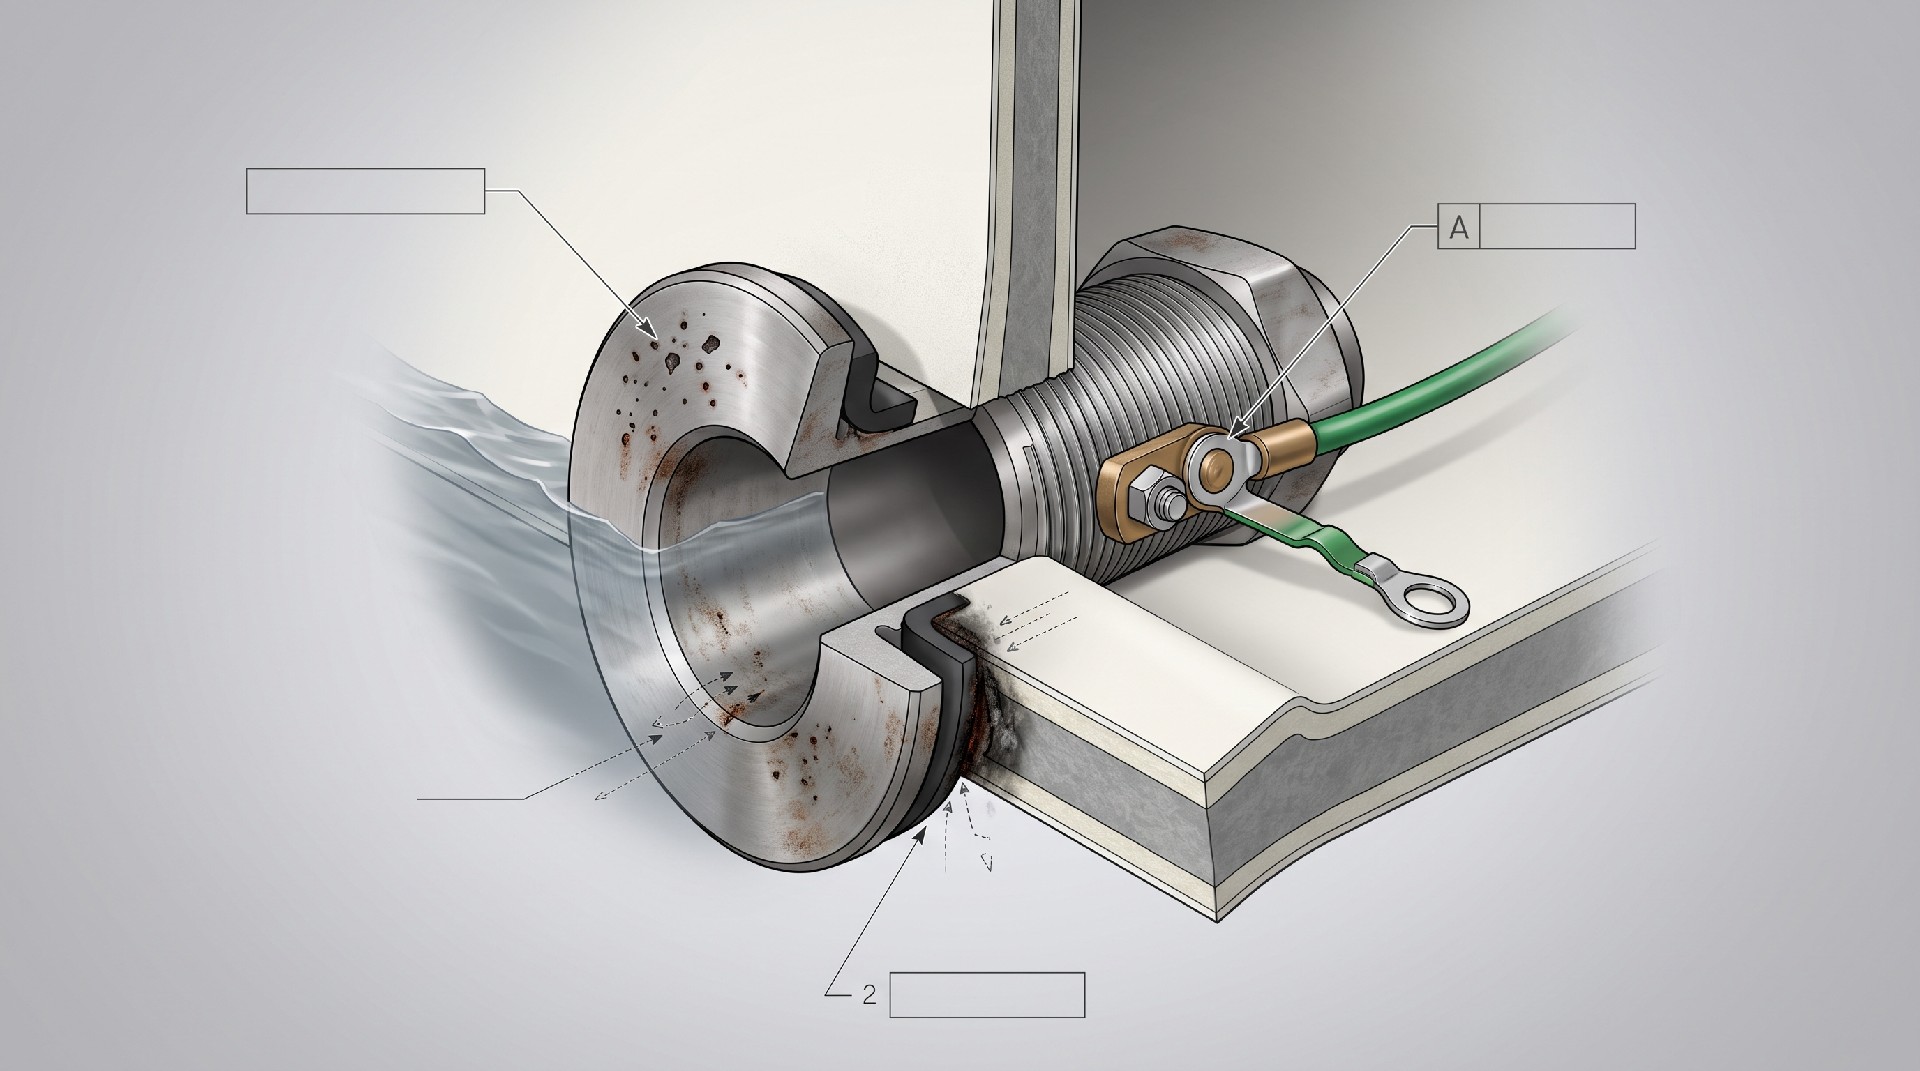
Maintenance Schedule for Saltwater-Exposed Boats
Prevention is cheaper than repair. A practical schedule for commercial operators and serious recreational owners:
After every use: Freshwater rinse, especially trailer, outboard, and deck hardware. Inspect anodes visually.
Weekly: Check anodes for consumption. Inspect for new rust streaks or white oxide. Verify bilge is dry.
Monthly: Clean and inspect all accessible metal components. Test bonding continuity. Check shore power isolation.
Quarterly: Remove and inspect sacrificial anodes. Reapply corrosion inhibitor to electrical connections. Inspect through-hulls and seacocks.
Annually: Haul out or use a diver to inspect underwater metals. Ultrasonic thickness test critical components. Replace anodes as needed. Recoat any damaged areas.
For fleet operators, keep a corrosion log per vessel. Track anode consumption rates, repair history, and component replacement intervals. A sudden increase in anode consumption often signals a stray-current problem or a failing coating system.
Final Decision: What to Do If Saltwater Corrodes Metal Components on Your Boat
Start with diagnosis, not repair. Identify whether the corrosion is galvanic, pitting, crevice, or stray-current. Clean and inspect the component. Measure section loss. If the component is critical or loss exceeds safe limits, replace it. If repair is viable, use the correct preparation and coating system for the specific metal. Then break the corrosion triangle: maintain anodes, verify bonding, protect coatings, rinse with fresh water, and monitor. For commercial fleets, document everything and treat corrosion as a lifecycle cost driver — not an occasional maintenance item. The boats that last are not the ones with the thickest metal; they are the ones with the most disciplined corrosion-control routine.