

Why Standard Camping Advice Fails for Commercial and OEM Buyers
Most online guides on how to keep snakes and insects out of your camping tent are written for weekend backpackers. They suggest essential oils, zipping doors quickly, or hanging food away from sleeping areas. For a commercial operator, resort buyer, or OEM brand owner, those tactics are insufficient. The real challenge is designing, specifying, or procuring a tent that functions as a reliable biological barrier night after night, season after season, across varying terrains and climates. For an outdoor equipment manufacturer, a glamping resort, or a rental fleet operator, the question isn't just about a single remedy. It's about systematic exclusion: eliminating entry points through materials, engineering, and a disciplined deployment protocol.
This article addresses the search intent behind “how to keep snakes and insects out of your camping tent” from a B2B perspective. We will move beyond surface-level tips and focus on the technical specifications, design choices, and quality control measures that create a truly secure environment. The goal is to provide an engineering and procurement-grade guide, defining what works, what doesn't, and exactly what to verify with your supplier.
Defining the Biological Threat: A Commercial Risk Assessment
Before selecting a product, it’s critical to understand the threat profile for your specific use case. “Snakes and insects” is a broad category, and a one-size-fits-all solution is rarely effective. For a commercial buyer, the first step is risk classification. Are you deploying tents in a region known for venomous snakes? Is the primary concern nuisance insects like mosquitoes and flies, or is it ticks and chiggers which are smaller and can penetrate finer gaps? The answer dictates your engineering priorities. For example, the entry point for a large snake is a gap as small as 1 cm (0.4 in), while a tick requires a gap of less than 1 mm (0.04 in). The product architecture, specifically the mesh density and floor-to-wall connection, must be specified accordingly.
Commercial Decision Point: Threat Level vs. Airflow
Choosing a finer mesh to exclude small insects typically reduces airflow. For a rental fleet operator in a humid environment, this can lead to condensation issues, creating a separate, uncomfortable customer experience. The commercial decision is a tradeoff between biological protection and internal climate management. For a resort, this might necessitate a technical solution like integrated ventilation or choosing a product with dual-layer mesh that offers a high “Insect Protection Factor” (IPF) while maintaining acceptable air exchange rates. You must define your primary threat and decide if a product is designed to meet that specific need.
Critical Component 1: The Floor-to-Wall Connection (Seams and Material)
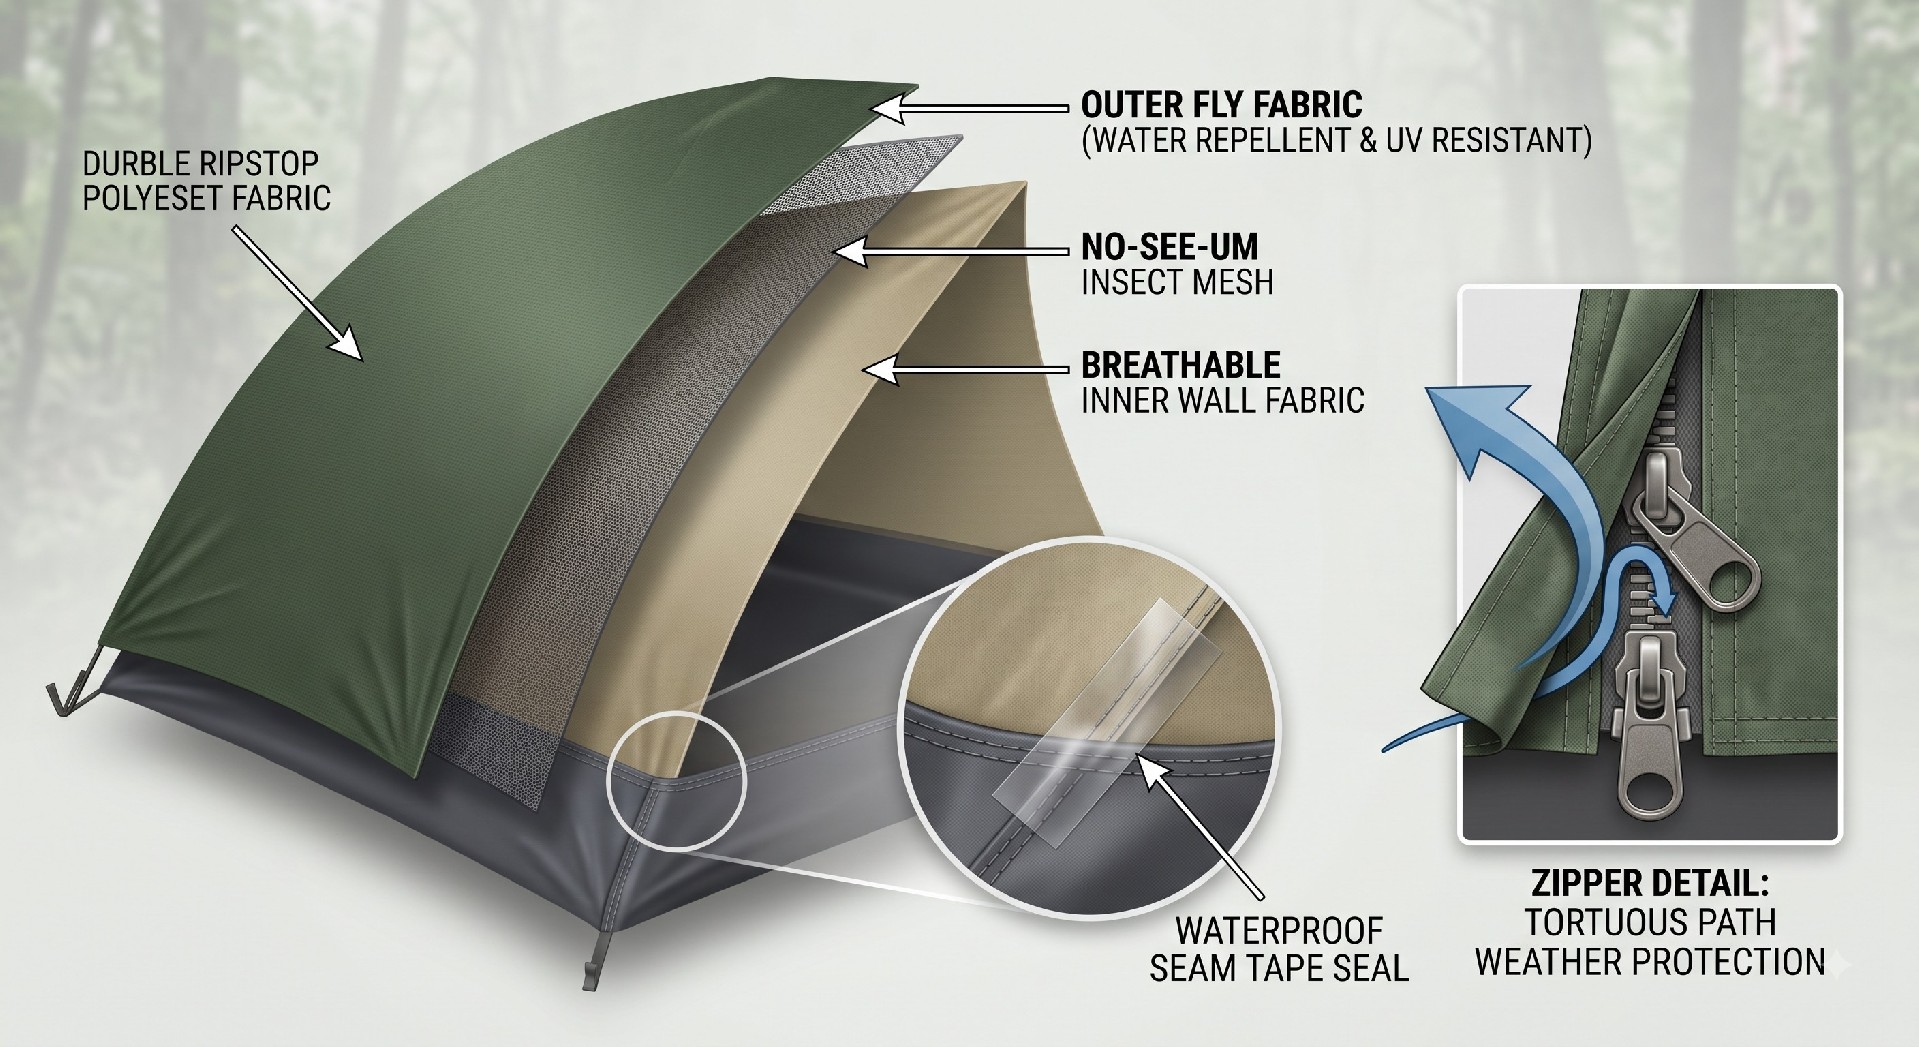
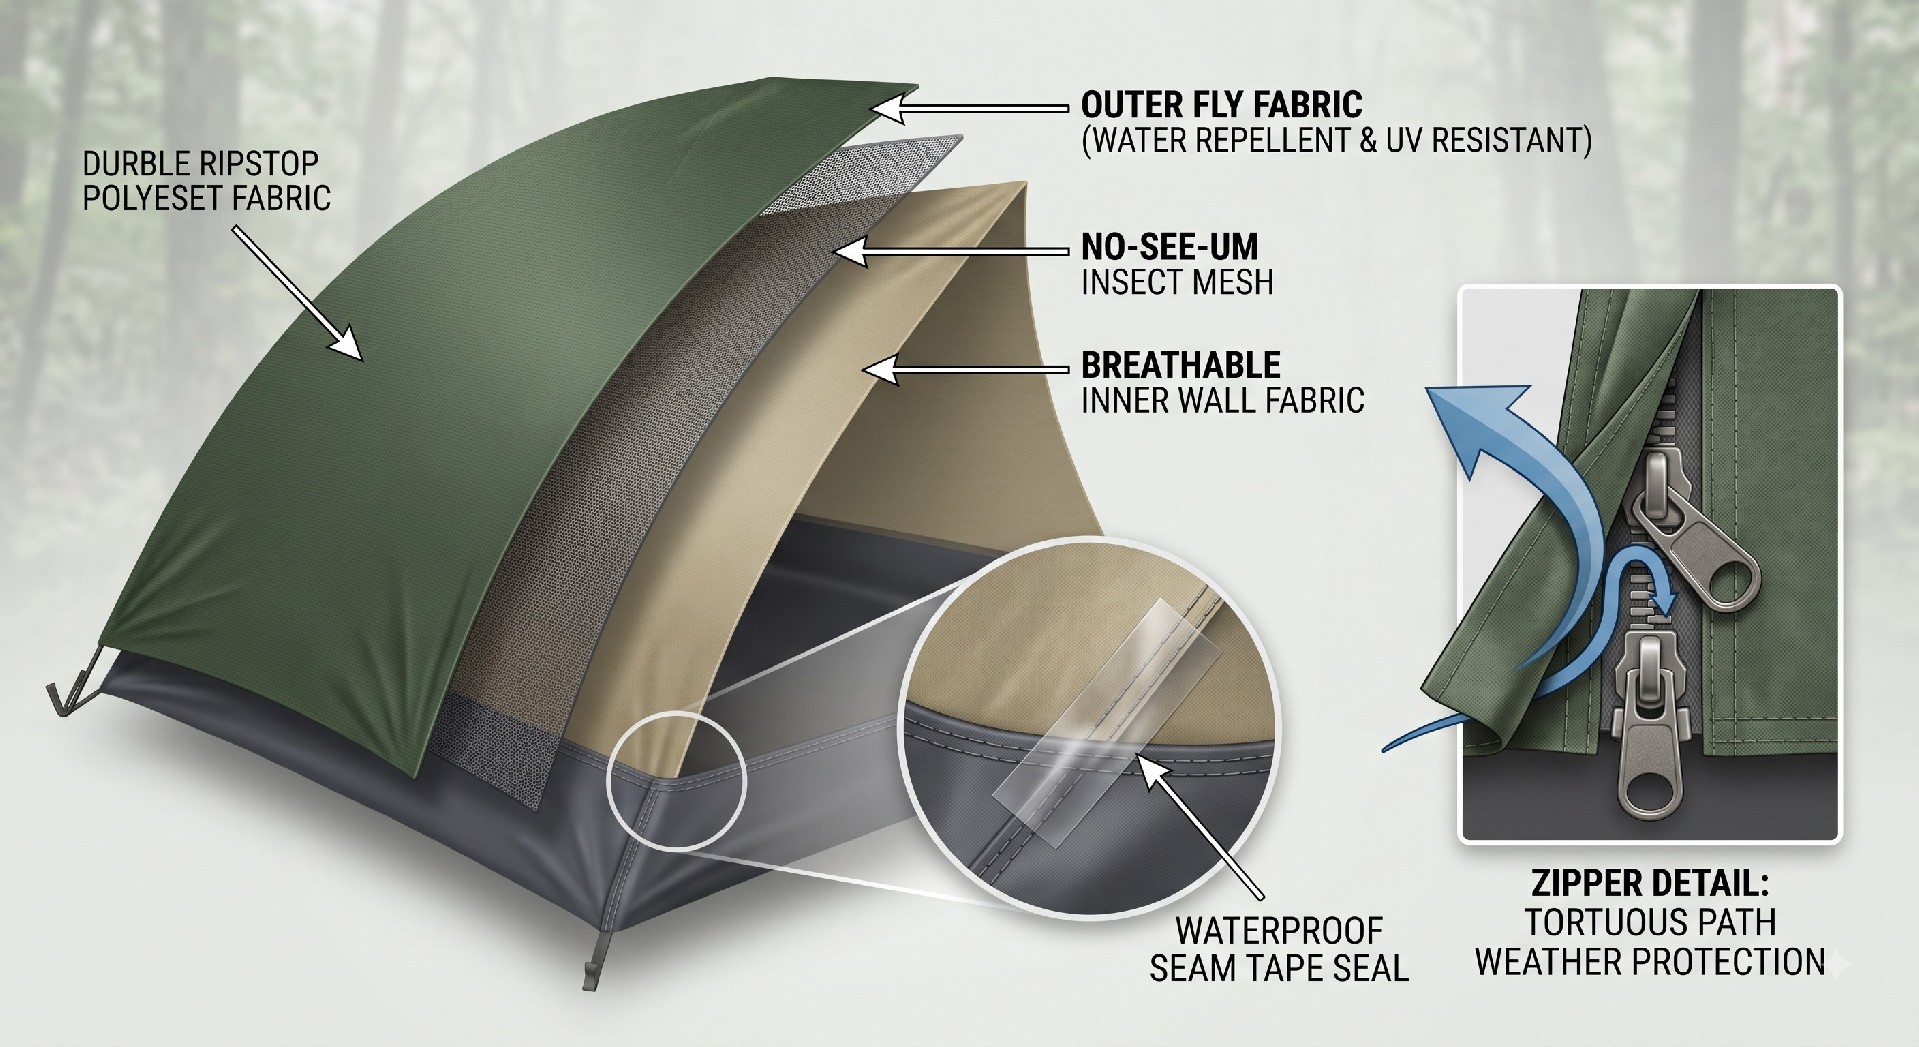
The most common failure point in any tent designed to keep out pests is the seam between the floor and the wall. Many tents feature a floor that is simply sewn to the wall, a design that is vulnerable. Insects and small snakes can exploit the needle holes and gaps created by the sewing process. More concerning is a traditional “bathtub” design with a separate, stitched-in floor. For a truly effective barrier, the product must have a sealed, seam-taped construction. The ultimate solution is a floor and lower wall constructed from a single, continuous piece of fabric, usually a heavy-duty PVC or TPU-coated nylon, eliminating the most critical seam entirely. This is a key specification for an OEM buyer or commercial procurer.
OEM Specification: Sealed Seam Integrity
When specifying a tent, focus on the floor construction and seam sealing process. A bathtub floor of 420D or 600D Oxford fabric with a robust PU coating is a common commercial target, but for maximum protection, a heavier material like 840D nylon or a PVC laminate is superior. The bottom line is the seam must be taped and sealed. In many commercial-grade tents, the floor material extends 15-30 cm (6-12 inches) up the wall, acting as a physical barrier. To verify quality, a buyer can request a sample of the seam construction for evaluation. A simple water or forced-air leak test at the seam can reveal manufacturing defects that would otherwise provide an entry point for pests.
| Design Feature | Target Specification (Typical Commercial Range) | Biological Threat Addressed | Commercial Justification |
|---|---|---|---|
| Seam Construction | Seamless bathtub floor or seam-taped floor-to-wall connection | Large snakes, crawling insects, ticks | Eliminates primary entry point; prevents pest ingress |
| Mesh Type (Insect Screen) | No-see-um mesh (50x50 - 60x60 holes/in²) | Ticks, no-see-ums, sandflies, mosquitoes | Provides a high Insect Protection Factor (IPF) while managing airflow |
| Zipper System | Large-tooth YKK zipper with a double-slider and a fabric storm flap | Snakes, flies, mosquitoes | Creates a secure, sealable entry point; storm flap adds a secondary barrier |
| Floor Material | 840D nylon or PVC laminate with a minimum 15 cm (6 in) wall rise | Crawling insects, snakes, moisture | Durable, abrasion-resistant base; raised wall prevents bridging and ground-level ingress |
| Ventilation Design | Dual-layer screen and fabric windows with adjustable vents | Humidity, condensation, insect access | Manages climate to reduce condensation while maintaining the biological barrier |
Critical Component 2: The Entry System (Zippers and Doors)
Doors and zippers represent the largest and most complex openings in a tent. How to keep snakes and insects out of your camping tent depends heavily on the integrity of this system. A standard coil zipper with small teeth can, over time, create gaps, especially if the zipper is misaligned or the stitching is weak. Larger snakes have been known to push through standard zippers, especially on cheap tents. Commercial-grade tents often use a two-zipper system: a sturdy outer door that uses a large-tooth zipper with a protective flap, and an inner screen door. This creates a primary and secondary barrier. A double-slider zipper allows for it to be locked, preventing forced entry and ensuring a tight closure.
Commercial Decision Point: Zipper Cycle Life and Flap Design
The zipper’s cycle life is a critical metric for rental fleet operators who will open and close doors dozens of times per season. Specifying a zipper from a reputable brand like YKK with a metal (not plastic) slider is a standard commercial best practice. A fabric “storm flap” that overlaps the zipper is essential. This flap should be designed with a slightly larger dimension than the zipper track and include a method to secure it, such as Velcro or magnetic snaps. This creates a tortuous path, making it difficult for insects to navigate through the zipper opening. The threshold at the bottom of the door is another crucial area; it should have a low-height, integrated barrier that seals against the tent floor.
Critical Component 3: The Mesh Specification (Weave and Denier)
The mesh that covers your windows and doors is the primary defense against flying and crawling insects. The two most important variables are the mesh count and the denier. Mesh count is usually measured in holes per square inch. A standard commercial-grade mosquito mesh is typically in the range of 40x40 to 50x50 holes per inch. This is generally effective against mosquitoes and midges. However, for smaller insects like no-see-ums or sandflies, you require a no-see-um mesh, which has a much finer weave, often 50x50 or 60x60, with smaller holes. The tradeoff, once again, is airflow. Finer mesh restricts airflow significantly, increasing condensation risk. The denier of the mesh fiber relates to its strength and resistance to tearing, which is important for commercial longevity.
Manufacturing and QC: Mesh Inspection
In an OEM setting, the specification must define the exact mesh type. A buyer should verify the mesh count and denier upon receiving a sample. A simple and effective QC check is to hold the mesh up to a light source and check for uniformity and the absence of manufacturing defects like “run” holes or uneven weave. The mesh should be tightly integrated into the tent canopy, usually sewn between fabric layers, so there is no gap where it meets the wall. A key field failure is when the mesh separates from the zipper or the floor seam, creating an opening that defeats the entire barrier. This is a direct result of poor seam construction, a primary supplier audit red flag.
The Commercial Deployment Protocol: Beyond the Product
The product architecture is only half the solution. The effectiveness of any tent’s biological barrier is heavily dependent on the deployment and maintenance protocol. This is especially relevant for a resort, rental operator, or emergency response team. A tent cannot be treated like a static structure. A key step in any commercial workflow is the pre-installation site check, clearing the area of rocks, logs, and vegetation that could provide a bridge for snakes to access the tent. The door should always be secured closed immediately after use, a simple rule that requires discipline from staff and customers alike. The tent should be placed on a durable groundsheet or tarp to add an extra layer of protection against ground-crawling pests.
Maintenance and Inspection Protocol
A systematic maintenance plan is the most effective way to ensure how to keep snakes and insects out of your camping tent over its lifespan. At each setup and teardown, staff should follow a checklist. This includes inspecting all zippers for smooth operation, checking the integrity of the storm flaps, looking for any holes or tears in the canopy, and verifying that the floor seam is intact. A critical maintenance point often overlooked is the storage of the tent. A tent that is stored damp or dirty is more attractive to pests and can degrade the waterproofing and seam tape, ultimately compromising the barrier function. A clean, dry, and well-ventilated storage environment is a simple and effective preventative measure.
Buyer's Checklist: A Specification Decision Matrix
For the technical product manager or procurement specialist, here is a concise decision framework for evaluating commercial tents based on their ability to exclude snakes and insects.
Define Threat Level: Identify the primary pest (e.g., large snakes, no-see-ums, mosquitoes). This determines the required mesh count and seam integrity.
Specify Floor Construction: Prioritize tents with a seamless, integrated floor design. Verify the material denier and the type of coating (e.g., PU, TPU).
Demand Seam Taping: Insist on a factory-applied seam tape on all critical seams, especially floor-to-wall connections.
Verify Zipper Quality: Request zipper brand and cycle test data from the supplier. Demand a robust storm flap and a secure door-closing system.
Inspect Mesh Count and Denier: Verify the mesh count and fiber denier against your specification. Check sample for uniformity and defects.
Test the Barrier: Conduct a field test or sample inspection to confirm the tent is airtight enough to prevent pest ingress, using a light test or a low-pressure air test on the seams.
Review the Deployment Protocol: Integrate a detailed setup and teardown checklist into your training and operational manuals.
By following this framework, you can move beyond the generic advice and make a technically sound, commercially viable decision that ensures your users enjoy a safe, pest-free experience, whether they are campers, guests, or personnel.