

Why a Small Tear Demands a Different Repair Protocol Than a Leak or Seam Failure
In commercial inflatable boat operations—whether for rental fleets, rescue services, or resort watersports—a small tear in the hull is not a catastrophic failure. It is, however, a critical early warning. Unlike a pinhole leak or a failing seam, a tear represents a localized loss of tensile integrity in the base fabric. If repaired with a generic patch kit or, worse, ignored, that small tear can propagate along the warp or weft of the reinforcement scrim, leading to delamination and eventual hull replacement. This article details a field-proven, high-strength PVC repair procedure for small tears (under 50 mm) that restores structural strength without introducing rigid patches that create stress risers. We focus on commercial-grade boats, where downtime costs exceed the price of materials by a factor of 10 or more.
Assessing the Damage: Tear Geometry and Fabric Orientation
Before selecting a repair method, classify the tear by its relationship to the boat's fabric weave. High-strength PVC hulls use a woven polyester or nylon scrim sandwiched between PVC layers. A tear parallel to the yarns (a warp or weft split) is more prone to propagation than a diagonal or jagged tear. For any tear longer than 25 mm, the repair must include a fabric patch that bridges the tear, not merely a PVC surface patch. For tears under 25 mm that are non-jagged, a high-viscosity PVC adhesive can sometimes seal the cut fibers, but we recommend a patch for all commercial applications to restore rated tensile strength. Use a bright light behind the hull to inspect for secondary micro-tears radiating from the main cut—these are common in high-stress areas near the chine or transom.
Required Materials and Shop Conditions
Commercial repair quality depends on materials matching the original hull specification. You will need:
Matching PVC fabric: Same denier (1,000 to 1,500 denier typical for commercial RIBs) and same coating weight (commonly 800–1,200 g/m²). Obtain remnants from the manufacturer or a certified supplier.
PVC solvent-based adhesive: Two-part or high-strength single-part (e.g., MEK-based) formulated for high-frequency welded PVC. Avoid hardware-store general-purpose adhesives.
High-temperature heat gun or hot-air welder: Capable of 500–600°C with adjustable airflow, fitted with a wide nozzle (20–40 mm).
Solvent cleaner (MEK or isopropanol) and tack cloth.
Roller or silicone squeegee for bubble-free lamination.
Temperature- and humidity-controlled environment: Ideally 20–25°C and relative humidity below 65% for proper curing.
Shop Preparation
Clean the area around the tear with MEK to remove grease, UV-degraded surface layer, and old wax. Sand the patch zone (both hull and patch back) with 120-grit sandpaper to create a mechanical key, then wipe again with solvent. Do not skip this step—adhesion on PVC is 80% surface preparation.
Step-by-Step Repair Procedure for High-Strength PVC
Step 1: Stop the Tear
Drill a 3 mm round hole at each end of the tear, just beyond the visible crack tip. This stress-relief step prevents propagation under hull flexing. For a 40 mm tear, two holes suffice; for larger tears, add intermediate holes every 25 mm along the path.
Step 2: Patch Design and Preparation
Cut an oval patch from matching fabric, sized to extend at least 50 mm beyond the tear in all directions. For high-stress areas (near the keel or transom), extend the patch 75 mm. Radius the corners of the patch (no sharp edges) to reduce peel stress. If the tear is on a curved section, heat-form the patch to match the hull curvature before adhesive application using a heat gun at low setting (approx. 150°C).
Step 3: Adhesive Application and Drying
Apply a thin, uniform coat of PVC adhesive to both the hull repair area and the patch. Allow the solvent to flash off until the adhesive is tacky but no longer wet—typically 10–20 minutes depending on ambient conditions. For high-strength bonds, two coats are recommended on the hull side. Do not apply adhesive to the inside of the tear itself; the goal is to bridge the tear with the patch, not fill the gap with adhesive.
Step 4: Lamination and Heat Activation
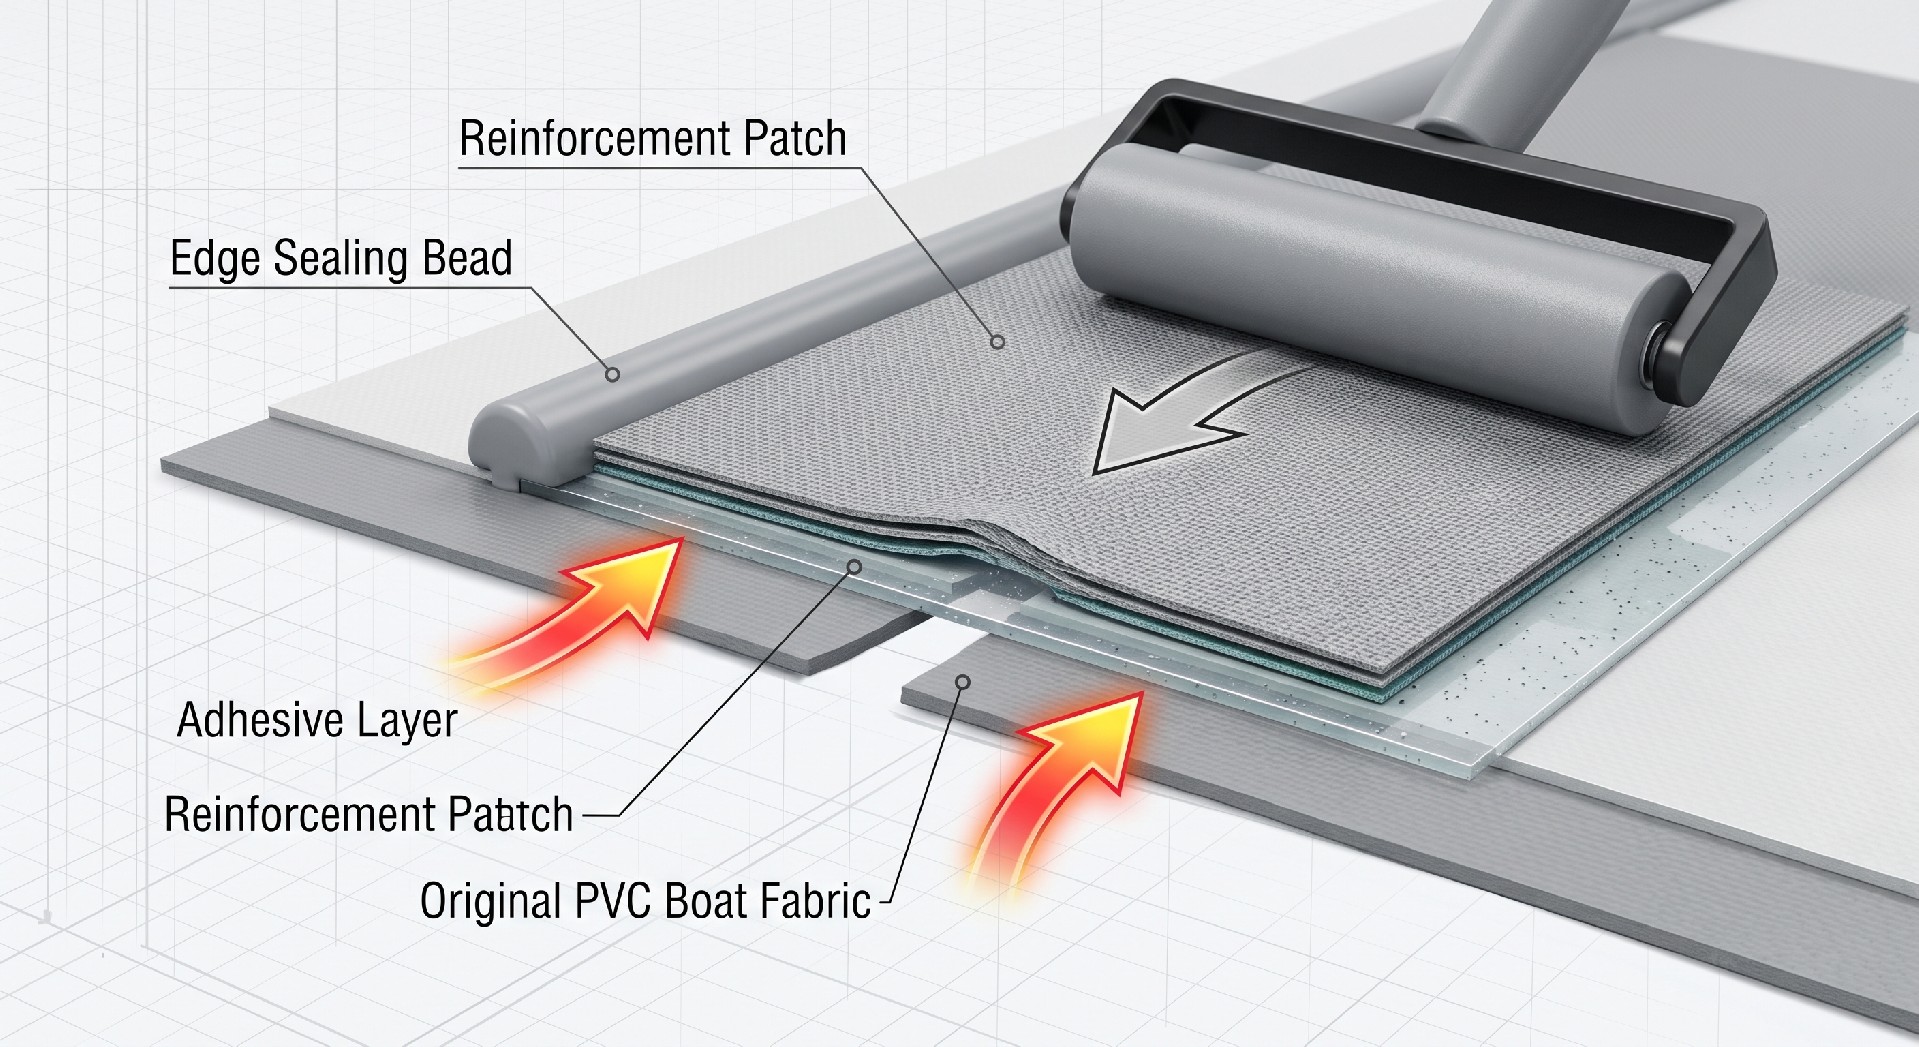
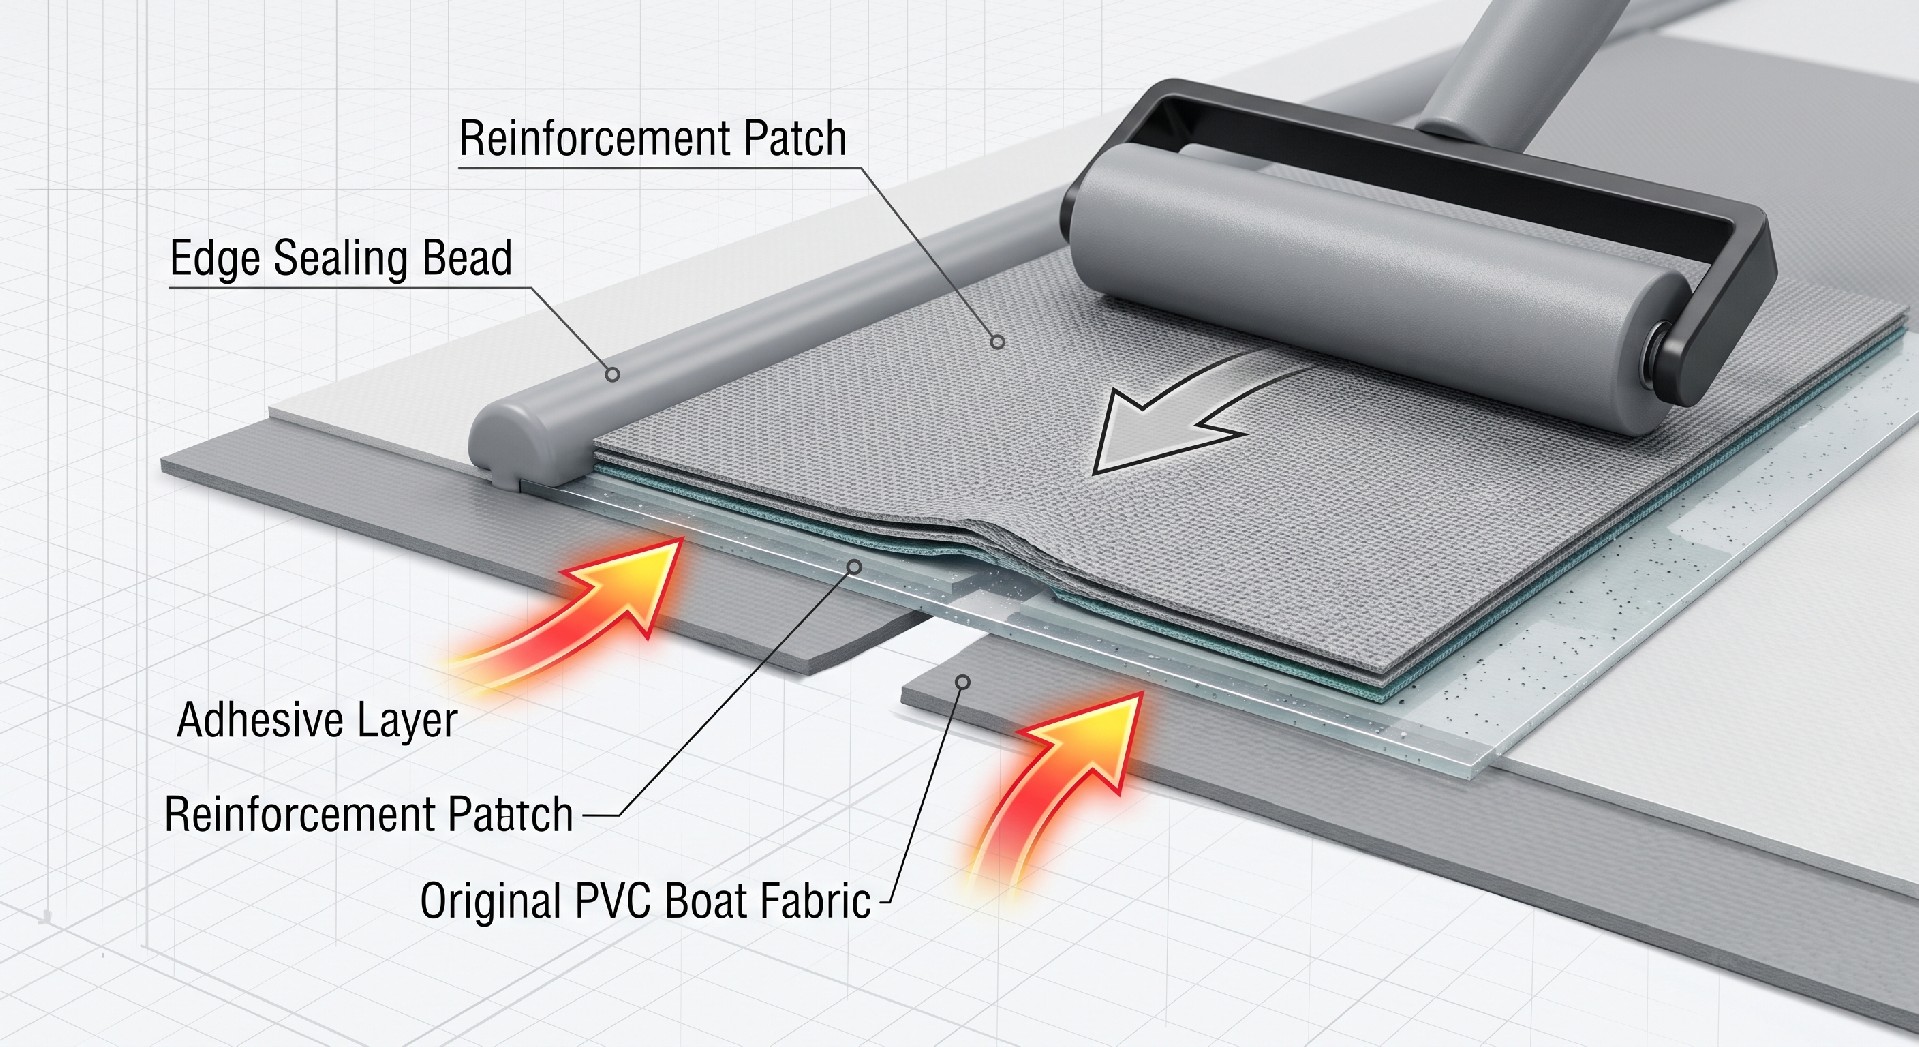
Position the patch over the tear, aligning the fabric weave direction with the hull's weave. Apply heat with the hot-air welder at 550°C while simultaneously pressing with a roller, working from the center outward to expel air. The heat activates the adhesive and slightly plasticizes the PVC, creating a molecular bond. Maintain pressure until the patch cools to room temperature—typically 5 minutes. Do not overheat; discoloration or bubbling indicates degradation.
Step 5: Edge Sealing and Curing
Apply a thin bead of adhesive around the patch perimeter to seal against water ingress. Allow the repair to cure for 24 hours at room temperature before inflating the boat to working pressure. For emergency field repairs, a 4-hour cure followed by low-pressure testing (2 PSI) is acceptable, but the boat should be re-repaired in-shop before full commercial use.
| Repair Decision Factor | Repair Recommended | Replace or Relegate | Commercial Justification |
|---|---|---|---|
| Tear length | Under 50 mm | Over 75 mm or jagged | Long tears compromise scrim integrity beyond patch capacity |
| Proximity to seam | Over 150 mm | Within 100 mm | Heat-affected zone from welding reduces adjacent fabric strength |
| Repair history (same area) | First or second repair | Third repair or more | Accumulated adhesive layers increase stiffness, creating stress risers |
| Fabric condition | Intact, no discoloration | Frayed scrim or yellowing | UV degradation indicates generalized material embrittlement |
| Boat use classification | Leisure rental (< 50 HP) | Rescue or commercial ( > 50 HP) | Higher dynamic loads require factory-certified repairs |
| Duty cycle | Intermittent use | Daily commercial operation | Frequent flexing accelerates patch edge failure |
Testing and Return-to-Service Criteria
After curing, perform a pressure test at 50% of the hull's working pressure (typical commercial RIBs: 3.5–4.5 PSI). Mark the patch with a chalk circle and monitor for any deformation or peeling after 15 minutes. If the patch lifts, the repair has failed; remove it and re-prepare the surface, as contamination or insufficient heat was likely the cause. Once passed, reinflate to working pressure and perform a static leak test using a soapy water spray—no bubbles at the patch edge. For a small tear in a high-strength PVC hull, this repair protocol, when executed correctly, restores 85–95% of the original tensile strength in the patched area. The boat can return to commercial service with an inspection interval of 25 operating hours before the next scheduled check.
When to Replace Instead of Repair
A small tear is repairable, but not indefinitely. If the same area suffers multiple repairs, the cumulative heat history and adhesive layers reduce the substrate's integrity. A repair is not recommended when:
The tear is within 100 mm of a seam, valve, or D-ring attachment.
The tear exposes significant scrim fraying or discoloration (indicating UV degradation).
The hull fabric shows general delamination in the area (detected by a hollow sound when tapped).
In these cases, a full section replacement by an OEM-certified facility is more cost-effective than repeated field repairs. For fleet operators, track repair history per hull to identify when a boat is approaching its end-of-life for repairability.
Commercial Decision: Repair Procedure and Fleet Downtime
For a rental fleet with 20 boats, each small tear repair costs approximately $45 in materials and 2.5 hours of labor. Downtime—if done in-house during low-usage periods—is negligible. However, outsourcing to a shop adds transport and waiting time, often exceeding 48 hours. The economic break-even point: if a boat requires more than three structural repairs in a season, replacement of the affected tube or hull section is more cost-effective. For high-end rescue boats, where reliability is paramount, a tear repair should be considered a temporary measure until a factory-trained technician can perform a hot-welded patch with reinforcement backing. The final decision matrix below guides commercial operators.